WATCH ME!
I promised you that this week was going to be about capturing your kids adventures. I'd like to specifically focus on seeing and capturing the big picture because while you're probably OK with just filling the frame with your subject, when it comes to showing more of their surroundings and bringing in more context of your family adventures into the frame - this is likely to present more of a challenge.
Why “Big Picture” Matters
When we photograph children, our instinct is often to zoom in - to focus on the face, the expression, the eyes, the action. It’s understandable. That’s where the emotion lives, right? But children don’t exist in a vacuum. Especially not when you're trying to capture the story of their adventures. They exist in the world - in parks and gardens, on beaches and hillsides and yes, also cities, and pavements and other less than green areas. And that world - the places they run, explore, dig, and get tangled up in, is just as much part of the story as the child themself.
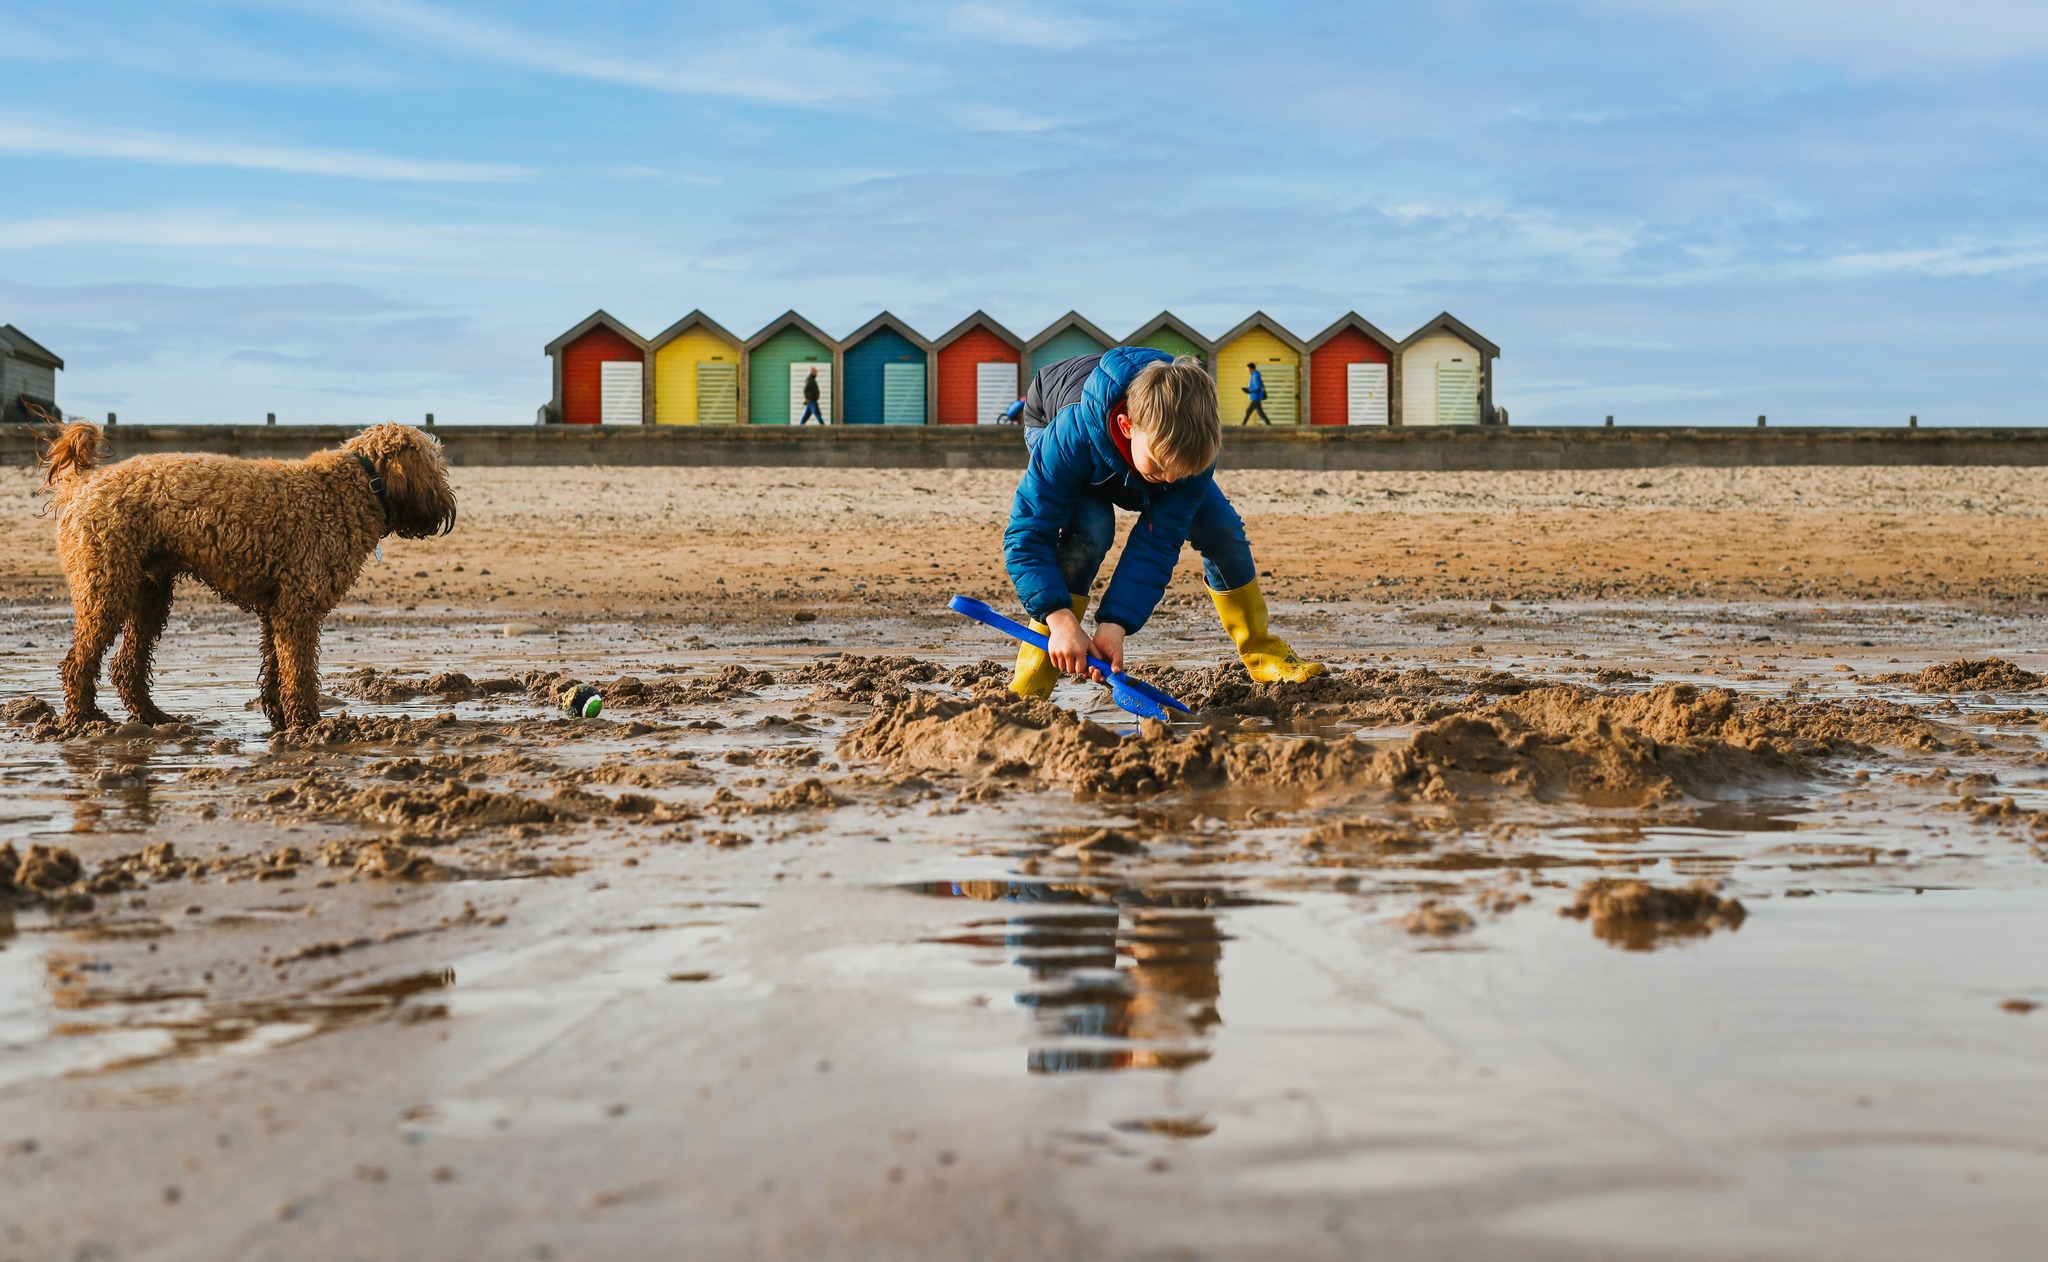
What a Big Picture Shot Does
A strong wide shot gives context to your storytelling. It creates a sense of scale, of smallness, wildness, possibility.
And when you photograph children, especially outdoors, that sense of scale is gold. It reminds us just how small they are - not just physically, but in the best way - small within something bigger. And it lets us see how they relate to the world around them.
The big picture gives us:
- Context– What’s the environment like? Where is this happening?
- Connection – How does the child fit into the space? What are they exploring, surrounded by, drawn toward?
- Scale - how does your child compare to the relative size of the elements in their space? Does it underline their smallness? Vastness of the space?
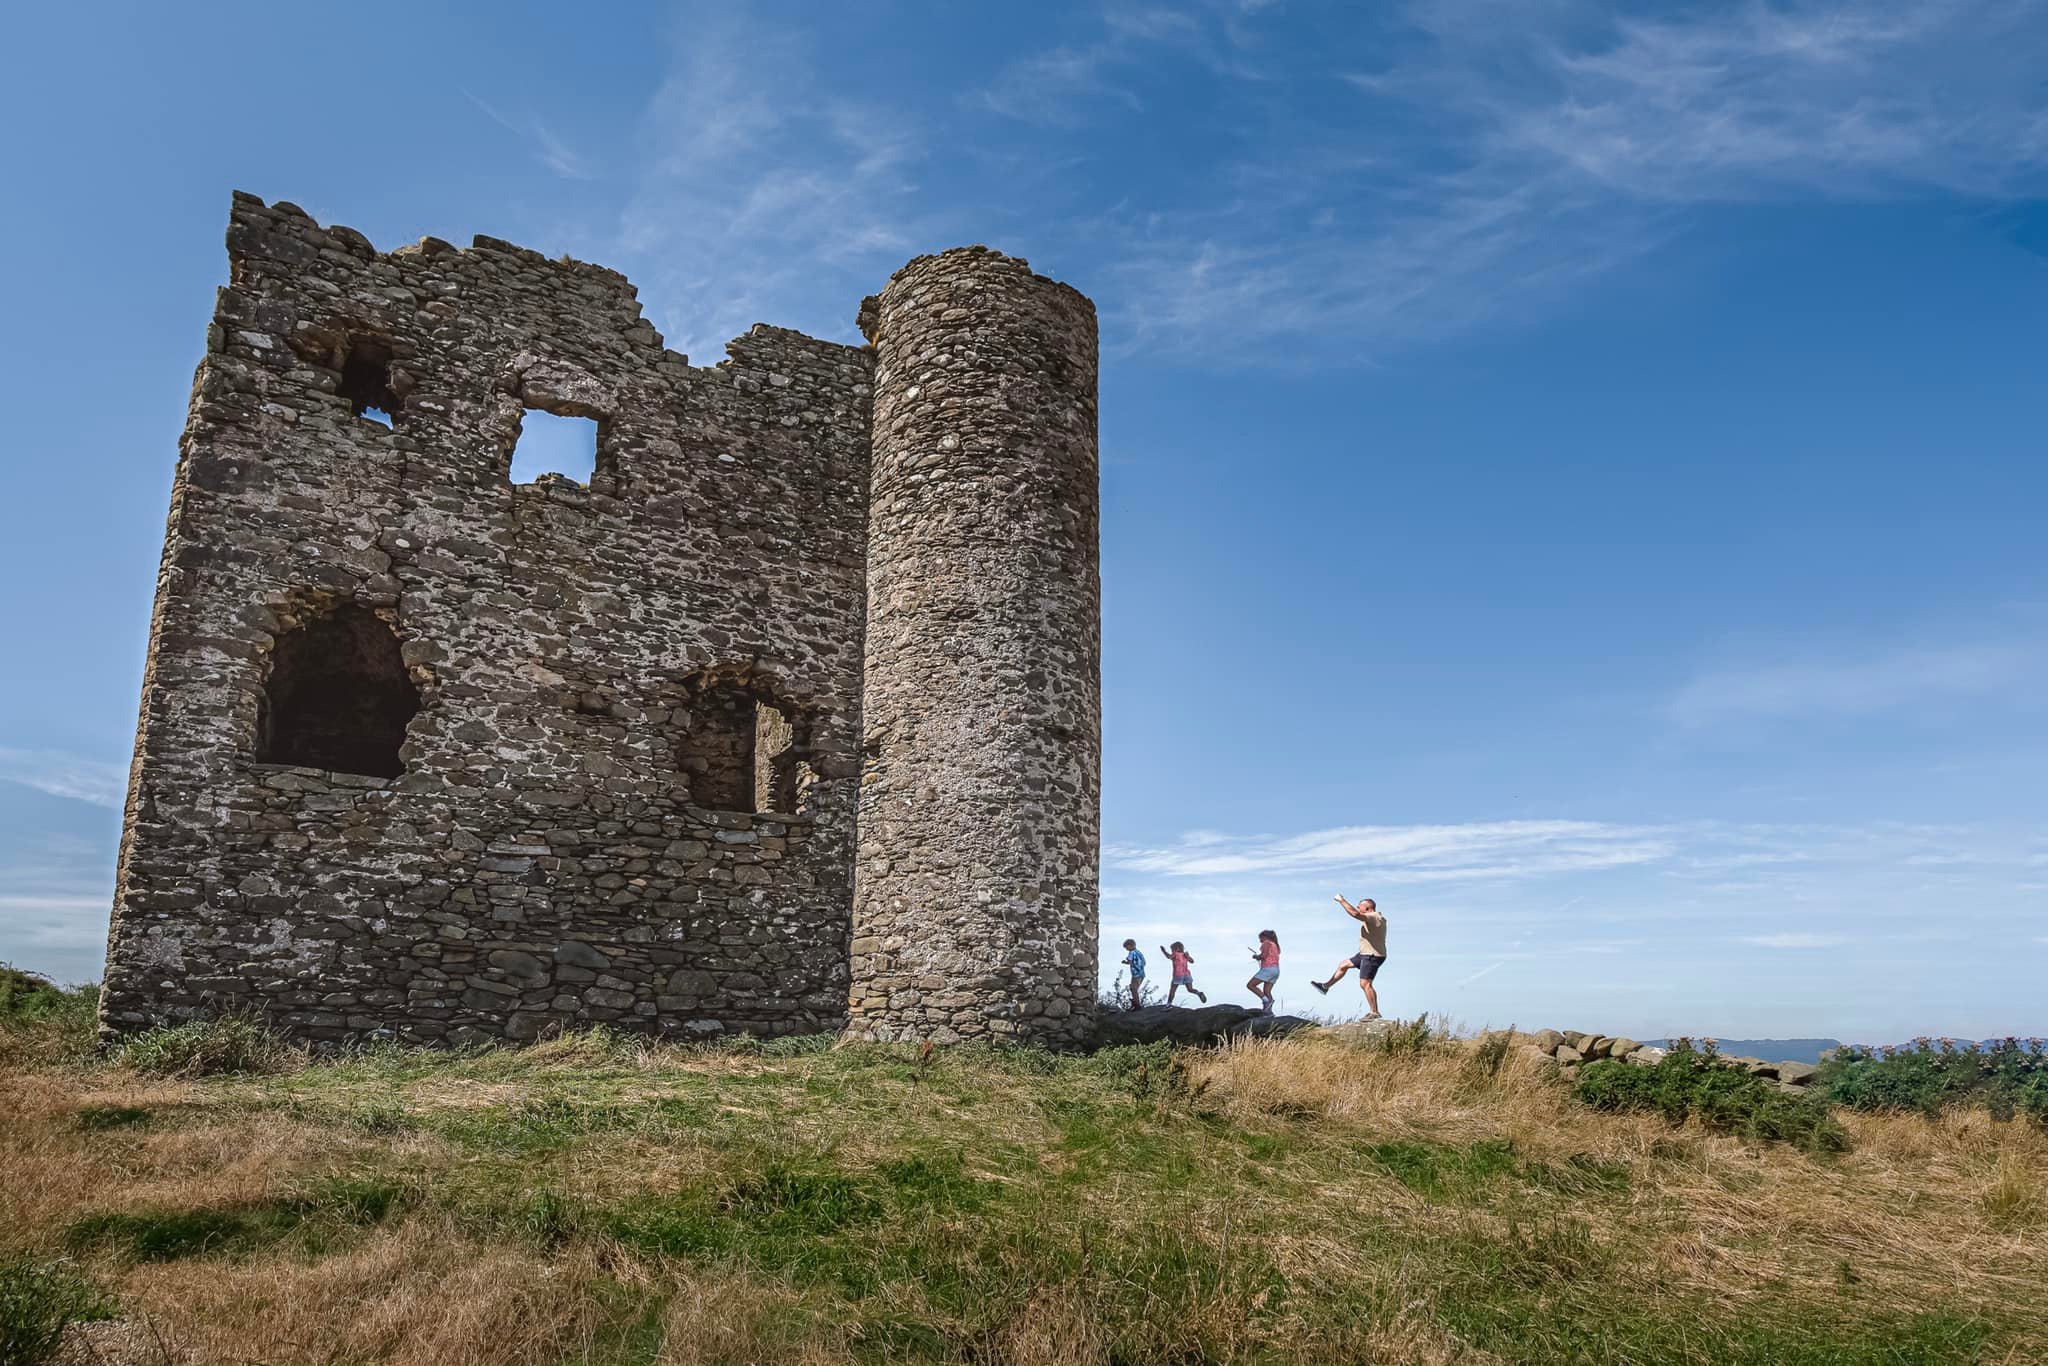
How to Think Like a Wide-Angle Storyteller
You don’t need a wide-angle lens to capture wide shots - though it helps. What you do need is the willingness to ACTIVELY notice the space around your subject and ADJUST what you capture in camera.
So ask yourself:
- Can I move further away?
- Can I include more of the scene?
- Can I show how my child fits into the environment, not just that they’re in it?
The moment you make space for the environment, your storytelling shifts. The photo becomes less about a child in isolation, and more about a child in relationship with the wide open world.
Let's get practical:
I know that unless you've been photographing for a while, you're most likely not used to considering the space in that way. So I want to give you a process to use when trying to capture those bigger, wider shots.
Photographing kids in the great outdoors:
STEP 1 - The story: what is this photo about?
So you're out and about with your kids. You want to capture them out there. But I want you to pause first. Before you even put the camera to your eye, I want you to consider - what in this view is worth committing to your memory card? Is it about a person in the surroundings? Or is it about something that's happening? Is there a wider activity/action context that requires our attention? Or is it simply about the look, the feel, the mood of the place, never mind your child?
Ond once you know what it is that you're capturing, I want you to think about the space - what in that space is a key part of that stoiry? What could / should be excluded? What provides additional information to someone who wasn't there when the photo was taken.
This step is really important because if you know WHAT you're capturing, you'll be much better at organising it in your frame to reflect it. You'll know whether the space is important to include and if so, how much thereof.


STEP 2: Framing the space.
Subject Placement: Centre, Off-Centre, or Rule of Thirds?
Step 2 is more about making the most of the space you have within that flat rectangle of your photo. We call it 'your frame'.
You may not think it matters that much, but where you place your subject, could be a difference between an 'ok' photo and a great photo and it's all about how our brains understand and 'read' visual information.
I could spend a month on why this matters. In fact in our Fundamentals course we have a full module ( 30+ A4 pages) dedicated to photographic composition where we explore not just the basic rules, but why they work and how they affect the way our brains process and understand visual information. Not enough time and space on here, so I will give you a shortcut.
So where do you place your subject? In the centre?
We see this type of photo over and over with our students’ early photos, and I completely understand why. You pick up a camera, look through the viewfinder at your child and instinctively look at the most important part of your child ( so to speak - they’re all pretty vital) - the head. So you instinctively put itin the centre of the frame.
Except, visually speaking, the centre can be very weak point.
Here is what happens when your brain looks at any image at all - it tries to decode the meaning behind it, the story. And I don’t mean it in a sense of - ‘once upon the time…’. It’s more about - ‘what am I looking at here? what’s happening?’. Photographs that catch your eye are the ones that make your eyes stop on an image - either because you saw something there that was action / mystery / emotion / question / indication of where they are / what they’re doing. THAT’s the story.
But centre placement can flatten the image. The viewer’s eye lands - and stays there. This works when the space that surrpornds them is not that important, but when you want to feature more of the space, encourage the viewer to notice it in relation to your child, it's not ideal. There are better options out there.
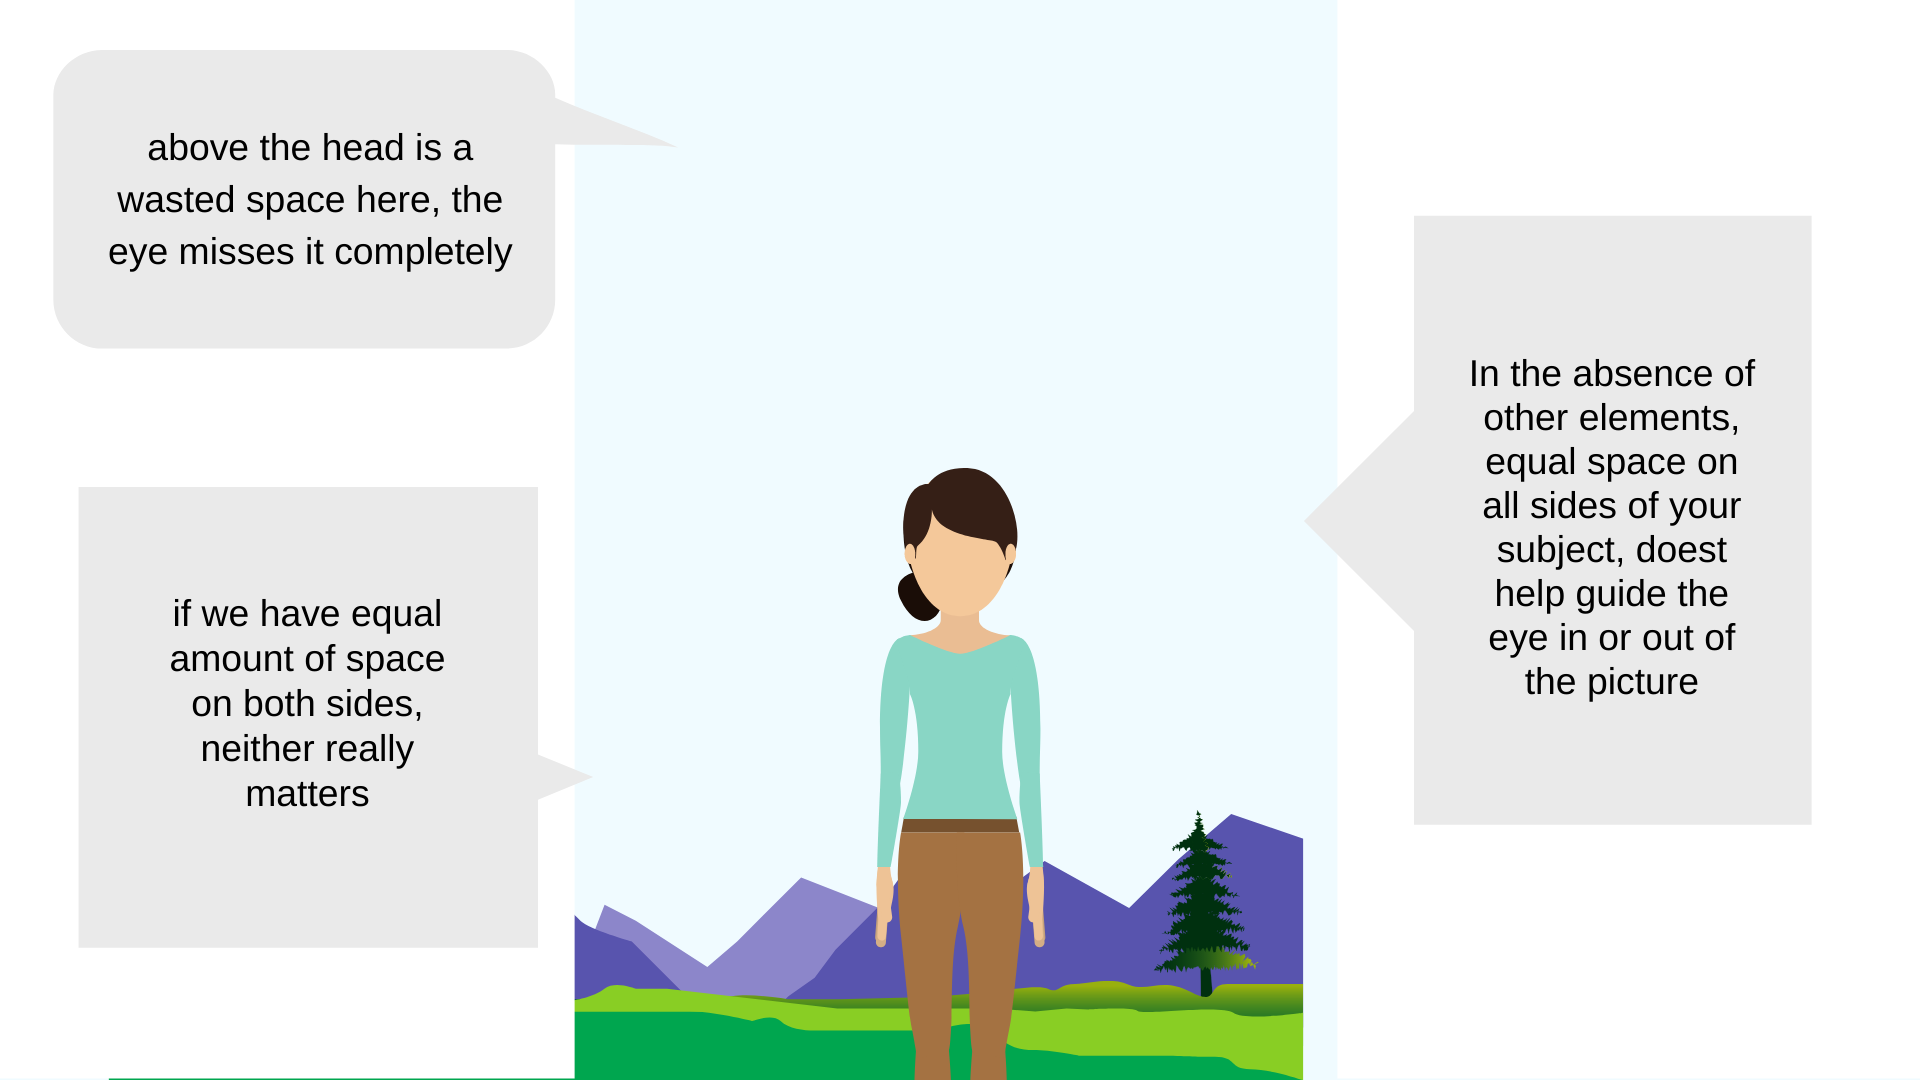
Two elements of composition:
To make a story come to life, photographers use 2 elements - the subject and the space around them - so called ‘negative space’ - that one is there to help the eyes ‘glide’ around, help us see what’s going on and where. You may not consciously notice it but it matters.
But when you place your subject centrally, a lot of that space is often simply wasted.
Your brain doesn’t get any help with what it should be looking at.
Immediately it discounts the space above - nothing going on there, you’ve wasted that space in the frame. With equal amount of space on both sides of the subject, neither really matters. We’re not captivated. The use of space is a waste.
When we teach composition, we always want to explain to you why something matters rather than just blindly having you follow a rule. I think it's important to understand that all that we do when it comes to photographic composition has its root in how our brains understand the visual information in front of us. That's why I wanted yout understand WHY it's often better to not just use the centre of your frame for composition, rather thank just telling you not to do it.
Which leads me now to a composition rule that many of you have heard about, but perhaps haven't considered before WHY it was advocating keeping things off centre - the Rule of Thirds.
Rule of Thirds
Rule of Thirds follows what we described above but it further refines it. It's one of the most well known composition rules in photography.
Rule of thirds : if you were to split your frame into three equal parts horizontally and vertically ( see below), your subject will be the strongest if you place them at the intersection of those divider lines.
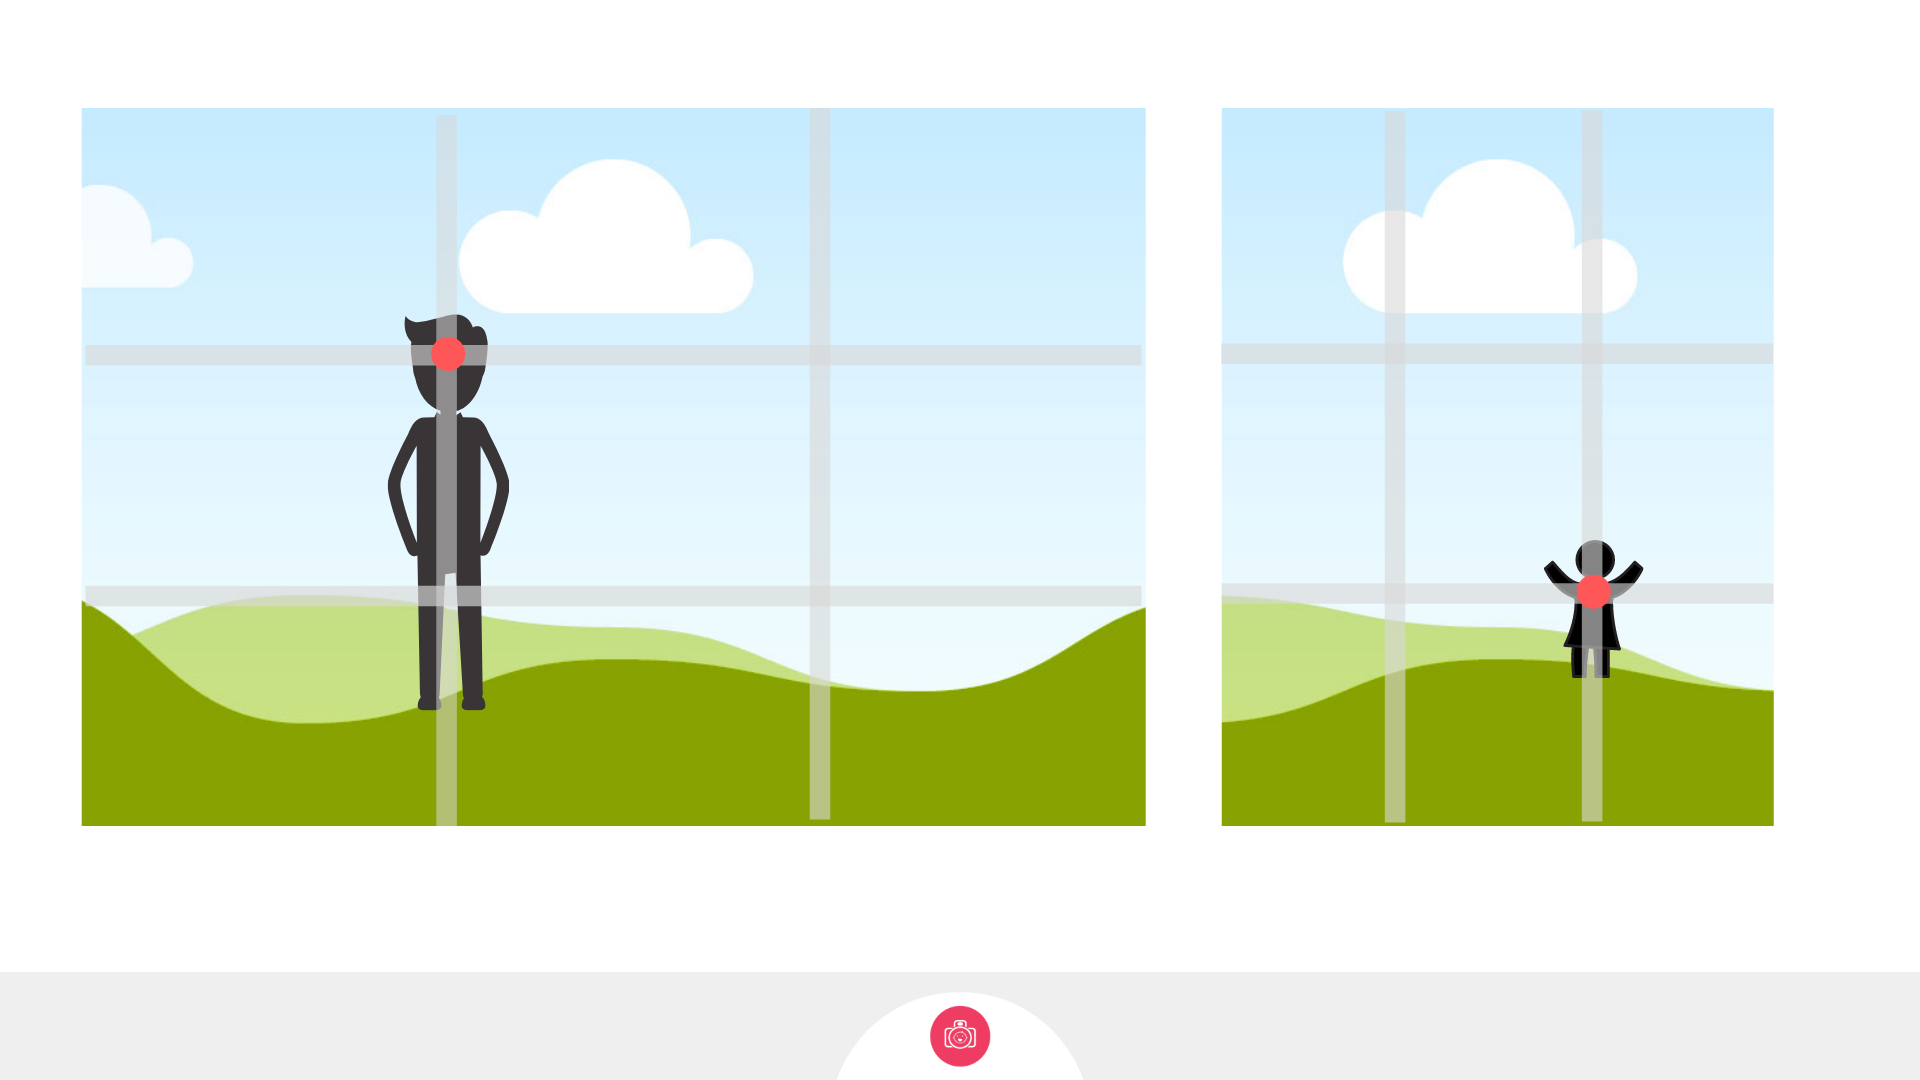


It’s an easy enough rule to memorise and it takes us away from centering the subject. The way the space works in this composition makes it easy for the eye to glide over the picture and stop at what’s important.
It follows how our brain likes to process the visual. And we see it in much more than photography. Next time you watch TV, notice how few people are placed bang in the middle of the screen, even if they’re alone in the frame.
Does it matter which of the 4 points I pick?
It may do in some compositions - if your child is running somewhere it may be sensible to leave more space in the frame in from of them than behind, if someone is looking in a particular direction, maybe leave more space towards where they're looking, but by and large, if you use this as your starting point, you’ll already have improved.
Does it mean I can NEVER ever place my child in the centre of the frame again?
Not at all. There are plenty of reasons why a more central composition might work best in some cases - where there is strong symmetry, where the space around actually frames it in that way, where there are other elements in the frame that lead the eye towards the centre. This is just one of the many photography rules - and sometimes the best photographs happen when you break them. Like I said - we have plenty more on the subject in our full course!
Consider the horizon line
And while we're dividing the space in 3 horizontal and vertical planes, I want you to also think about the horizon.
Much like our instincts tell us to place the subject dead centre in the frame, they also tell us to place the horizon in the centre of the frame.
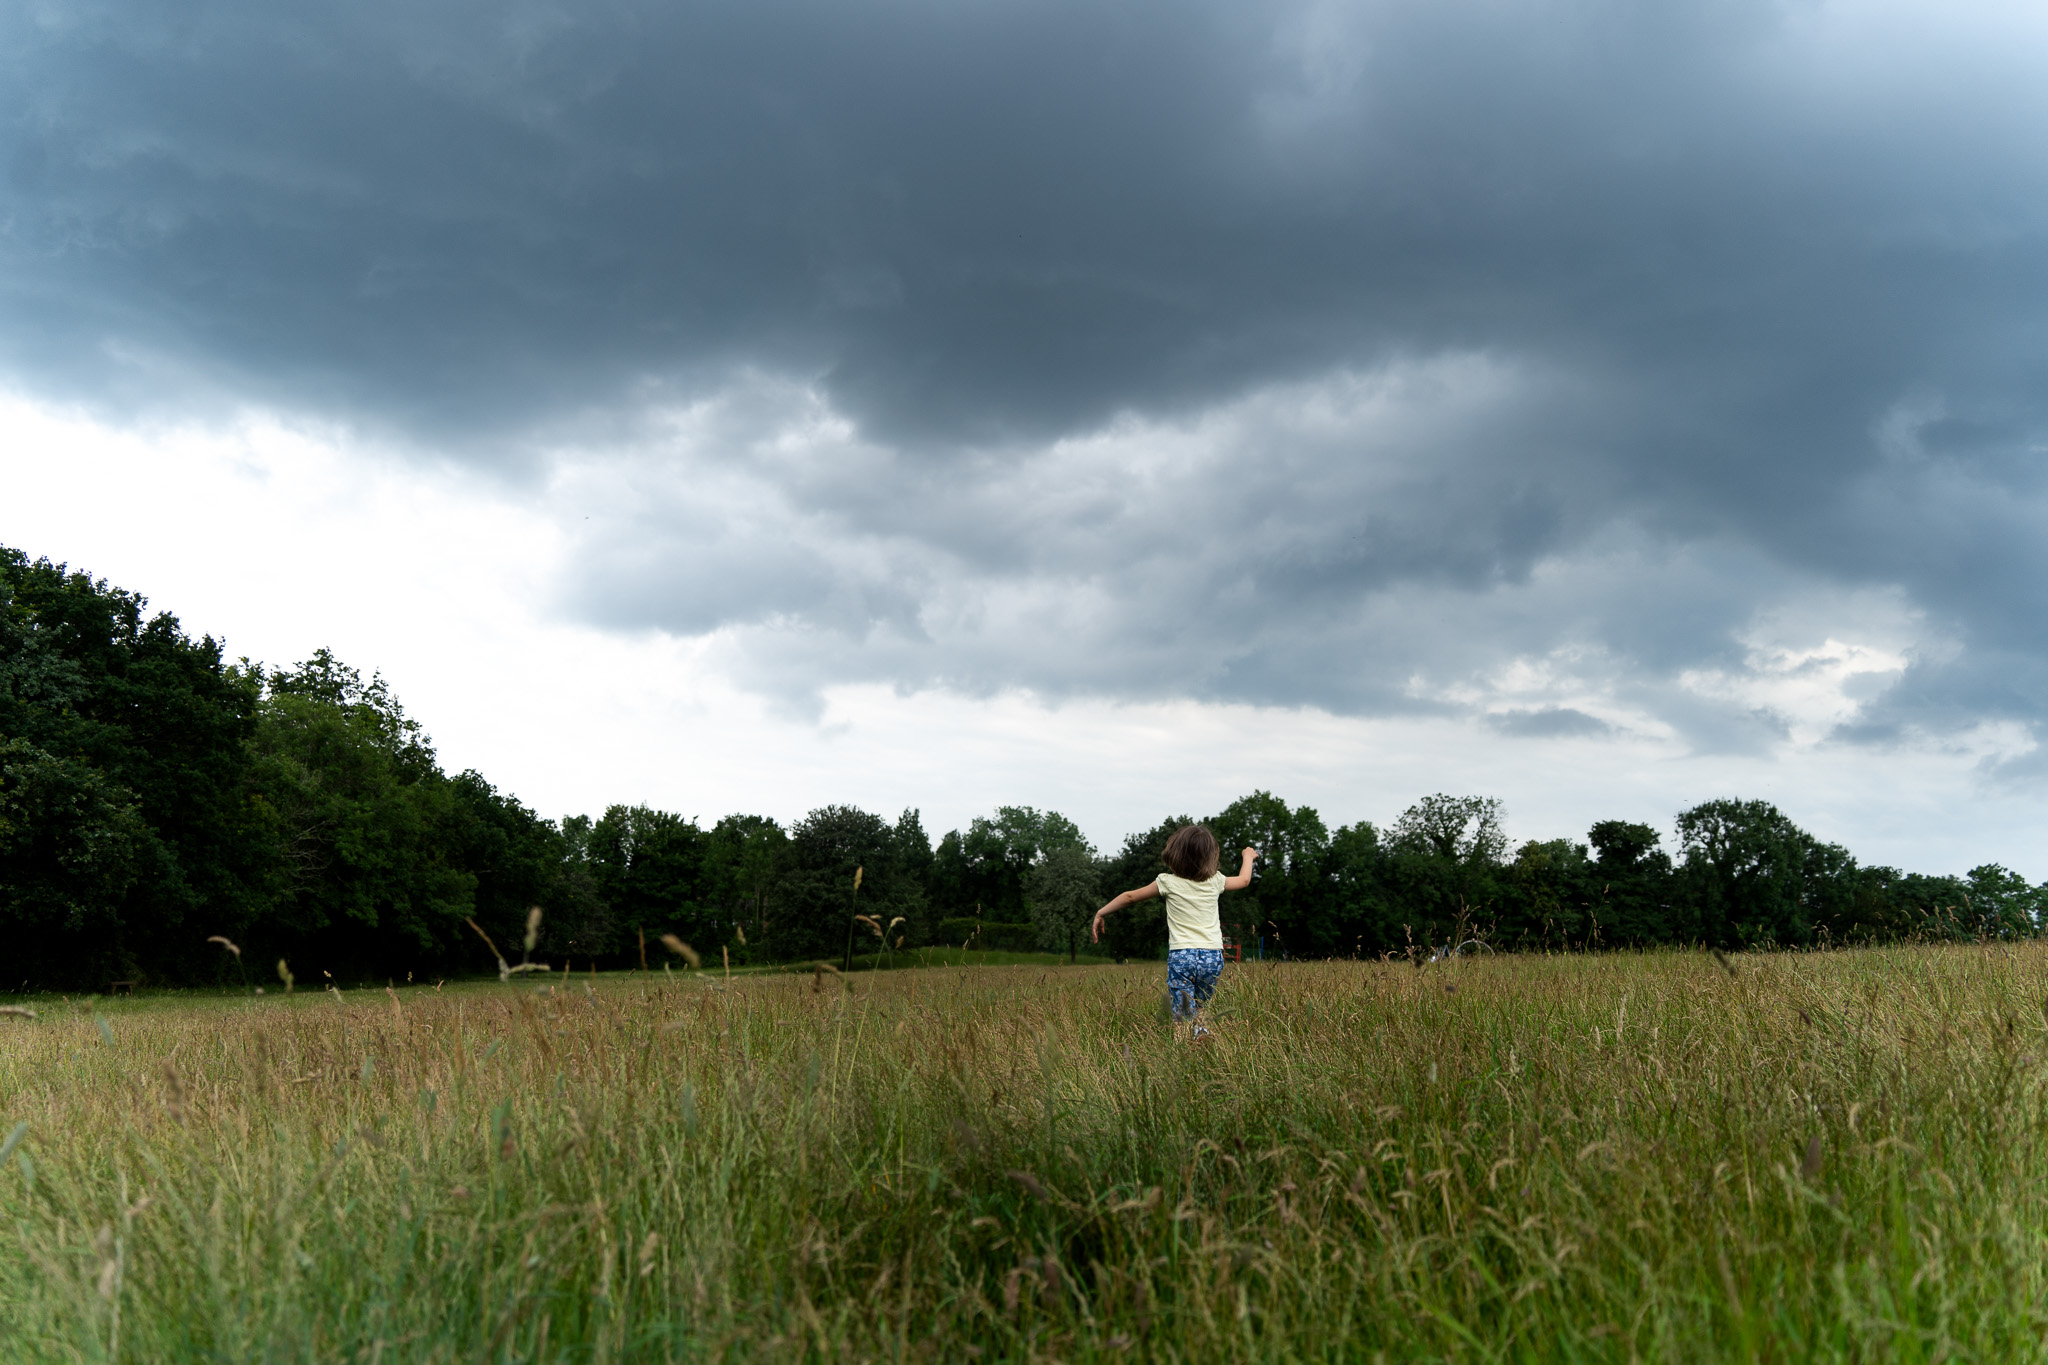
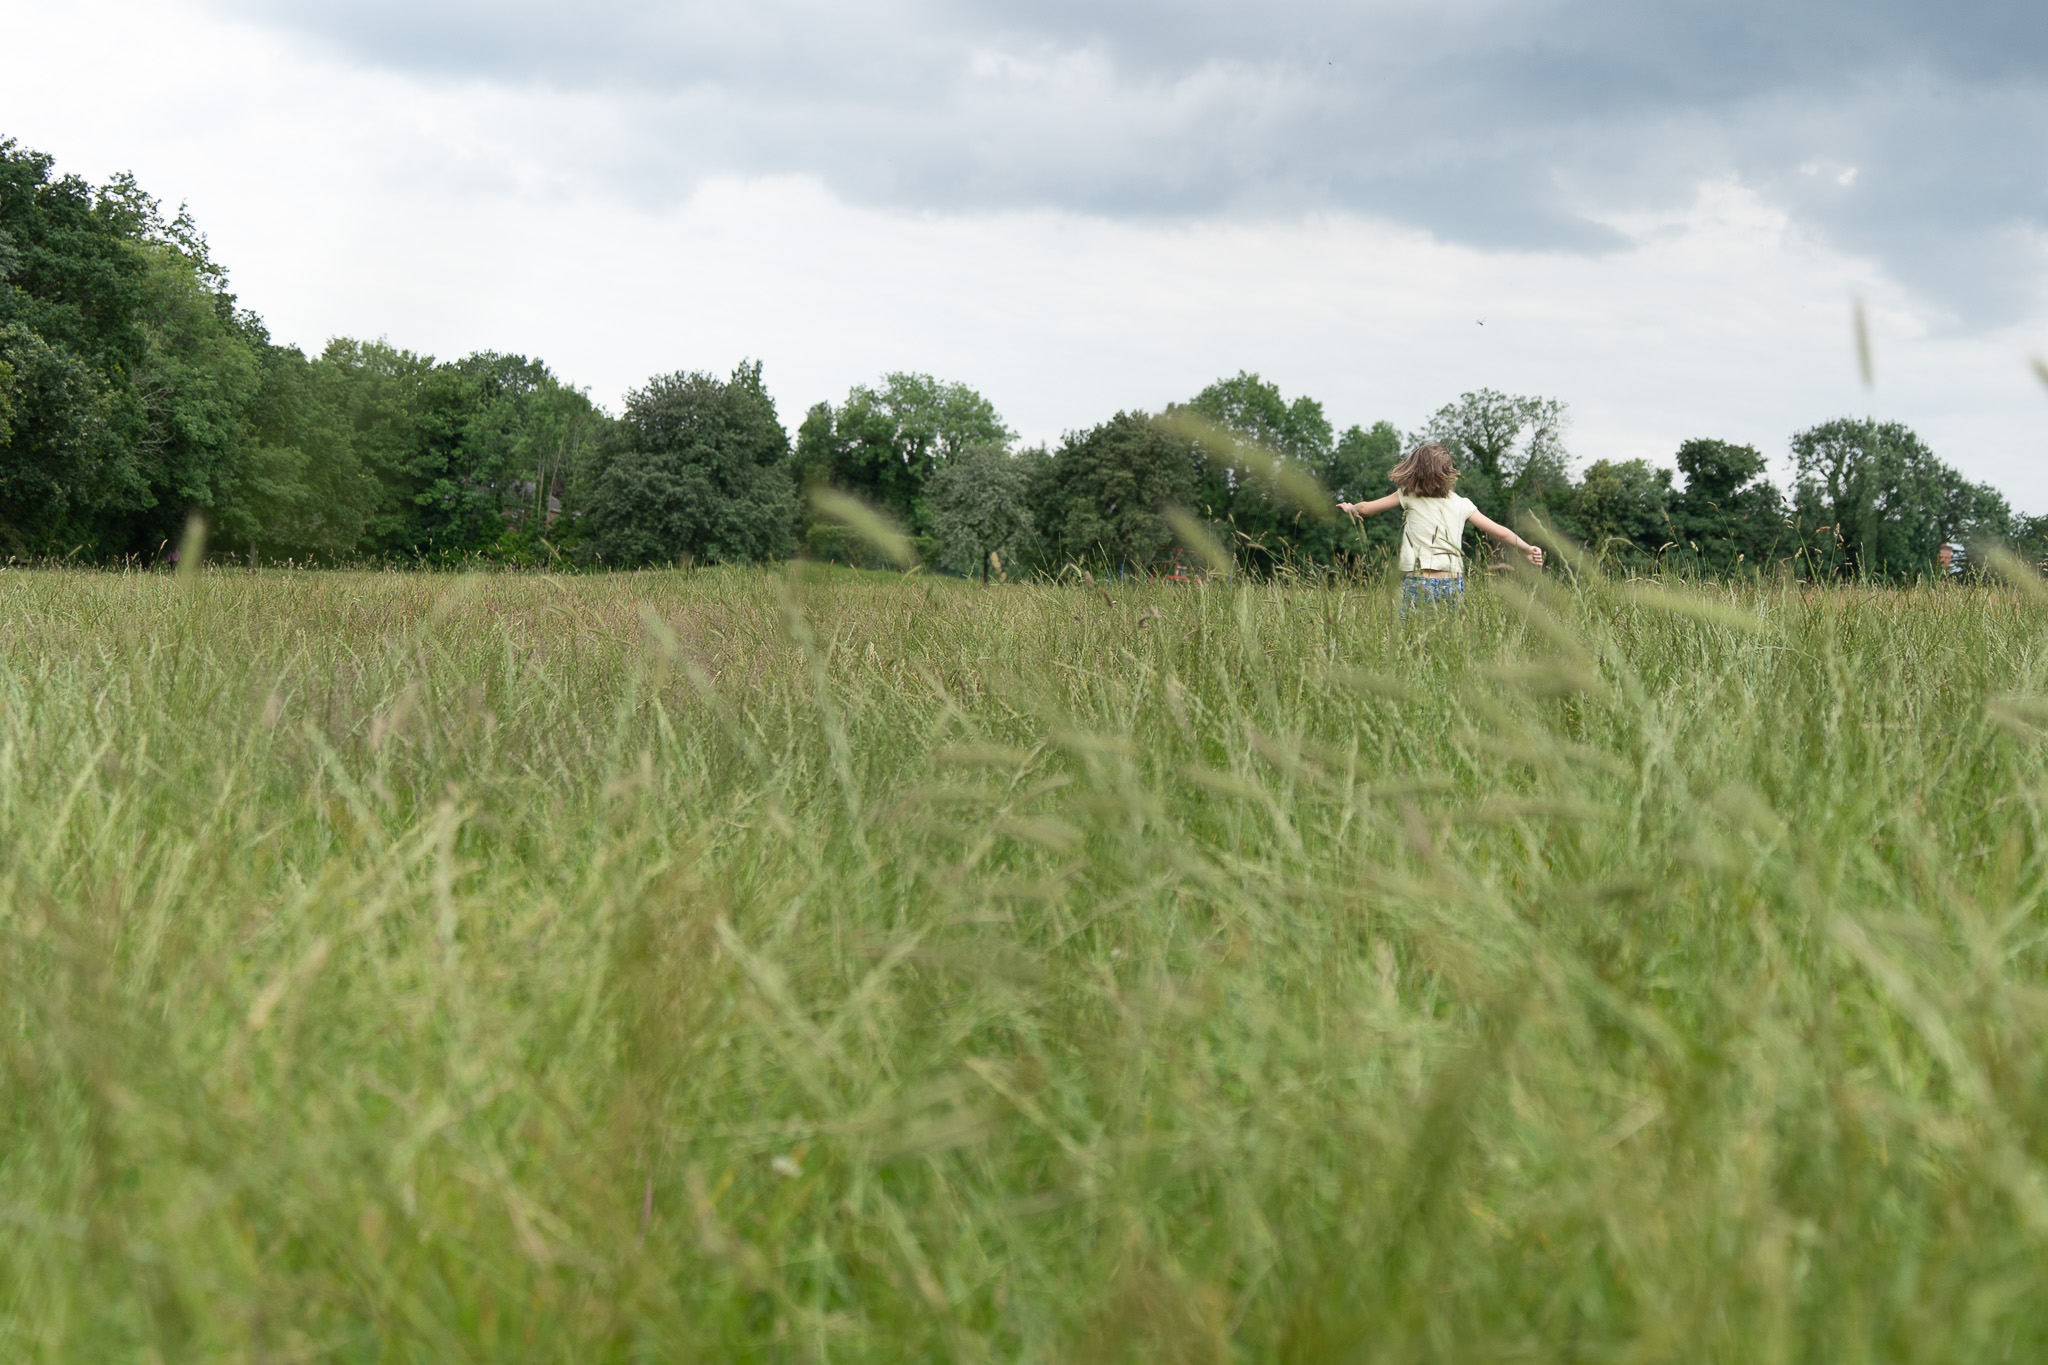
But I want you to resist this temnptation ( unless there is a specific reason why you want to do it - becuase there is strong symetry or contrast). and instead place the horizon either on the lower third line of the frame, or the higher third line.
Why? Because if everything in the frame is given the same amount of space, nothing stands out, nothing is more important that the other.
But by giving the sky more real estate in the frame, you bring more attention there. By giving the ground more space, you're telling the viewer - look here, pay attention to this!
This photo is all about that dramatic sky
This photo is all about the tall grass , the sky barely features.
STEP 3 : THREE DIMENSIONS
Ok, so now you know how to organise your subject and space in your frame, I want you to consider your world - through your camera - in three dimensions. So not just how wide and tall it is, but specifically how DEEP is your world.
Think about this: when you experience the world 'with the naked eye' - you see a rich, three-dimesional space. You can understand relative sizes, distances, you can move around, you can appreciate movement and speed, you have a much better sense of the space. Your brain does an amazing job working with all the clues provided by your senses. But when you take a photo, all you get to go by is a flat rectangle. Much less for your brain to work with. But we can make it better.
Here is what I want you to do:
I want you to consider what you see and in each space : notice foreground ( between the camera and your subject) , middle ground ( where your subject is) and background ( space behind your subject) .
In some images, try as you may, you will not be able to introduce all 3 - most often, the foreground will be missing - if all we have is thin air between the lens and your subject, then that's not much of a foreground.
But if you are able to include foreground and / or background, you are inviting the viewer on a journey inside your photograph and it can be especially powerful when you want to use nature to show your subject off.


Week 2 challenge
This week, focus on photographing the big picture of your kids being out and about.Try to compose your images using the three steps method:
- Step 1 : Noticing what your image is actually about and planning what to include / exclude from the frame
- Step 2: Applying the Rule of thirds ( or at least being conscous of not placing everything in the centre
- Step 3: Seeing of there is potential for bringing both foreground and background into the frame ( it won't always be possible but it's worth looking for it)
Donlt forget to use what you learned last week about different angles and positions! And make sure to post your images to the Facebook group!