WATCH ME!

Is there anything that screams more SUMMER! than water play? Water and kids go hand in hand - like ice cream and a flake, seagulls and chips or a daytrip and a tantrum. Kids just love it - whether it's splashing about in a paddling pool in their garden, dive bombing into a pool or cooling off in the sprinklers.
And there are SO MANY summer adventures which involve water! You could be at home with a water tray, you could be in your gardern with a paddling pool, sprinklers and water guns, you could be wrecking havock in your local splash park, you could be wading through a stream, or you could be at a seaside/lakeside/pondside? or a pool! And let's be Britsh about it - you could be staring at rain or jumping into muddy puddles ( thanks again Peppa)
Water play is so varied and the opportunites so plentiful, I could write a whole, full blown course on the subject alone and still not exhaust it, but I'll do my best to bring you some highlights with my best pro tips for capturing your kids playing in and around water.
And to give you an alternative if the weather is...ahem...more traditionally British where you are, I've added a bonus part on a different sort of wet weather.
")
But first things first - Protect your camera
I really cannot stress this enough - water and camera are mortal enemies. A splash on your lens glass may be ok, by water on the camera body or lens ( unless they are weather sealed by the manufacturer), can properly break it. Break it BAD. And let's not even entertain dropping your precious gear into water!
So take steps to protect your camera - use longer lens and zoom in instead of getting very close to the action. I have on occasion even wrapped the camera body into a plastic bag or cling film to make sure water can't get into the crevices.
If you go to the beach, avoid lens changes is possible - a single grain of sand can wreck your camera's lens or scrollers if it gets into the mechanism so pay extra special attention of how you handle your camera there.
Always have your camera hanging in a strap, especially when leaning over water.
If you're shooting with your phone, and you know you will be shooting close to a lot of water action, it may be worth investing in a protective cover. I recommend getting one that was made for your specific brand specifically and that will seal the phone in tight rather than the universal 'baggy' ones - in my experience these tend to fog up a lot and make your photos less clear.
The trouble with water
The trouble with water is that it's well, transparent. And shapeless. Both of which have endless potential of tricking your camera, but also what makes photographing it so exciting. How you capture water will change dependng on the light and its shape will be shaped by the passage of time ( aka your shutter speed), but also your position, what's in the background and your shooting angle.
Before we go onto the next page and explore a few different water based examples, I wanted to go through some technical and compositional considerations with you.
So how do you capture a great 'water' photo. Well, technically speaking it really is a combintation of 2 things:
1. Your shutter speed - a.k.a how fast your camera can take the photo
2. Your light - or more precisely, where, in relation to you and the water the light is coming from
1. Your shutter speed
There are a few variables which will have a big effect on what your water will look like, but none as key as your shutter speed.
Shutter speed is essentially the time it takes your camera to take the photo. Fast shutter speed means you take the photo faster and the camera is most likely to freeze the movent.
This is also what you want when you want to capture water as if it's frozen - droplets looking their perfect round or oval shape, puddle jumps bringing up perfect water crowns, looking like glass sculptures.
We would class fast shutter speed as being usually above 1/250s ( that's fractions of a second) but higher is even better - most cameras will go as fast as 1/2000s or even 1/4000s. A word of warning though - unless you are out in super bright sun, don't push it quite as high or you're struggle with light. Usually 1/500s or 1/800s will be perfectly fast for what you want.
Slow shutter speeds have a different effect on your water - with slow shutter speed, the camera takes longer to record a photograph, so it also records any movement that occurs in that time. This is when you can record water droplets looking like little lines or waterfalls and streams having that dreamy candy floss effect - I will be touching on it on the next page.
")
But if you're reading this with an increasing air of 'I have no idea how to even find my shutter speed' I have some very good news for you.
The good news is that unless we're talking rain, puddles and overcast weather, being outdoors in sunny weather will almost guarantee that you will get a fast shutter even if you do absolutely nothing in camera and just leave it on Auto.
That's because how fast your camera can take a photo is directly linked to the amount of light it gets ( that's why you have been getting blurry photos indoors) so lots of light = fast shutter speed.

Photo by Caroline Amer
And even if you don;t get those perfect droplets, that's ok! The slightly slower shutter can create fantastic images too!

Photo by Ros Farrow
If you are using your phone this week, you probably read all this and thought - it doesn't apply to me - but increasingly phone manufacturers are beginning to offer additional control settings in the pro options - often including the ability to change shutter speed. Hopefully, you shouldn't need it as getting plenty of light helps your phone camera shoot fast too, but of you're somewhere more murky, changing it up, may be exactly what you need.
2. Light matters
Alongside shutter, light will be the factor that will make your water photos shine ( quite literally!) or not.
Let's consider water: first of all - transparent, second of all, kind of magnifying, thirdly, reflective, finally - can make rainbows!
Now, quite HOW reflective, transparent etc the water will look in your images is going to be firmly down to light. More precisely, your light direction.
If you've done any of our courses, you are by now used to thinking about your light direction and what it means to your subject, but if you're new to us, it may not have been something you gave much thought to. But even if you're new to it, please bear with me, because it's really key here.
When we think about Light direction, we typically talk about your subject ( whether that's your child or a glass of water) being either:
- front lit - when the light source ( often the sun) is behind YOU - the photographer - but shining directly in them ( regardless where they face)
- back lit - when the light is behind them and shining directly on you
- side lit - when the light is coming onto you and your subject from a side
")
Depending on the direction of light, your water will look very different.
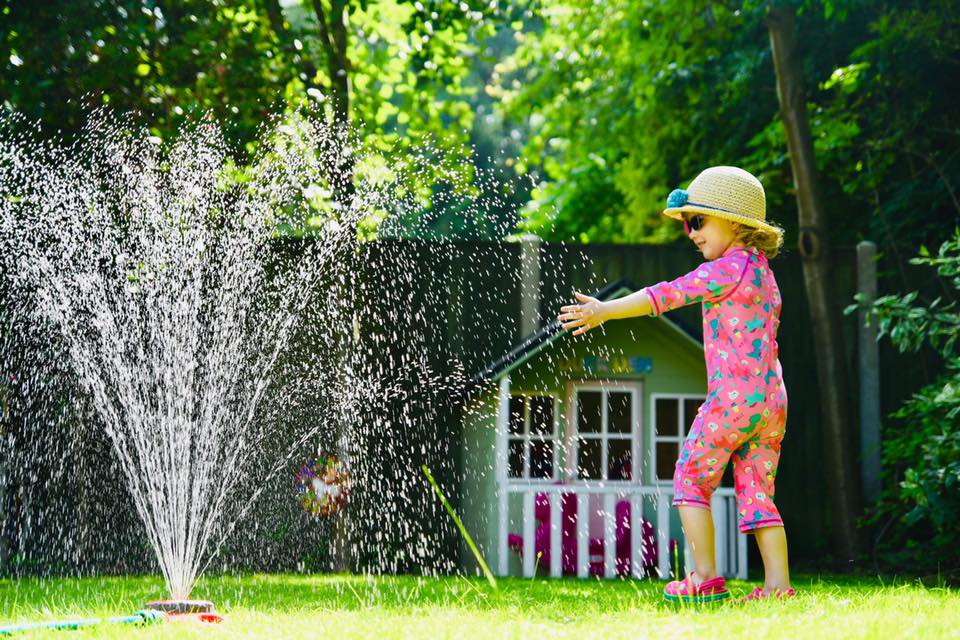
Let's consider a sprinkler :
With front light ( = light facing your subject), the light is hitting the droplets, picking them out from the background only by the virtue of reflection in their shiny surfaces. That's good, because that reflective quality of water is really helping you here. But that reflective quality is not that strong. We can do BETTER.
With Backlight or side light, we OBSERVE the light going THROUGH the water. But since those spherical little droplets create a magnifying effect, the light gets amplified as it goes through them and they end up looking like little drops of gold, little tiny lightbulbs.
")
And I know what you will say - you can't ALWAYS control where your kids will be in relation to light, often the situation will be - what we call - dynamic. But you CAN control where YOU stand! But this is where YOU move, Get that sprinkler between yourself and the sun and let the kids just get on with the rest.

3. Your background
The last crucial thing which is likely to make a big difference to the way your water is going to look in your images is the background.
Put water against a bright background ( like the sky for instance) and you will struggle to make it out at all.
But put it against a darker background - like a hedge, a fence, a building etc and it will literally shine.
To see the water, you need to offset it against something darker
")
Focusing woes
If we're talking sprinklers, we're talking something that often actively ends up being in front of or around your children which means that your camera may struggle a bit with where to focus.
I'm afraid I haven't got a magic bullet here. There are a few different approaches, but it will depend on how much you want to be fiddling with your camera and how precise you want your images to be.
Option 1: ( this is what I do)
Keep your camera on auto-focus, preferably with continuous focus / tracking focus activated ( this is the option where your camera holds the focus on your subject as they move around).
If your camera has it - turn on the face and / or eye detection because that way the camera will always prioritise the human over the water.
If you can, switch from multipoint / wide focus AREA mode to a zone/ group mode so that your camera knows to hunt focus in one place only rather than all over the frame. Single focus can work too, but I find I have a higher hits to misses rate with zone focusing.
But also - you will have hits and misses and that simply is just inevitable. Sorry!


Option 2: ( works best if you have a predictable spot where you expect the kids to be)
Switch to a static focus and pre-focus it somewhere you want your kids to be - the actual sprinkler itself may be a good point if you expect your kids to be jumping through it. Again, you need to make peace with some of the shots being missed, but as long as you shoot primarely into the same point and press your shutter as your kids hop over the water, you should get some gems too.
Option 3: (If you're quick and brave - I'm not!)
If you're quick and brave - manual focus. It's all ( literally) in your hands. I wouldn't recommend it unless you are genuinely comfortable with manual focus techniques, but if all else fails...

Paddling pool and water play
If your kids are having a more gentle, less frantic play in a paddling pool or around a water table, you have more time to get yourself set up for shots.
I'd recommend going for a mixture of storytelling shots - showing more of the space and what's going on, action shots - to focus on all the joy, and detail shots where you focus on the little things the're doing, looking at and exploring.
- For the storytelling shots, either go for short focal lenghts to bring a lot of the background into the shots (remember Focal lengths from our first week in this project? Short Focal length means as little zoom as possible - colloquially speaking. )

Photo by Jenn Thomas
If you're focusing on the action or detail, you may be better off moving back a little and zooming in. This will help blur the background and make your subject stand out more.


Photo by Lisa Friday
Go for the less obvious, tighter crop shots too - especially when put together with the action or wider shots, they tell the full story.


Photo by Michaela Strivens
If your children are playing with any water toys, look for opportunities to frame them with those toys or create a little textural variation blurring some foreground ( through a combination of close proximity, zoom and if you know how to do it - aperture settings) to help introduce a sense of depth.

but what if the weather fails to show up??
Puddles ( and other reflective waters)
Let's be British about it, you're far more likely to see this kind of water in Britain in summer that a warm water pool!
And while this may be a bit disappointing, listen, puddles are BRILLIANT for photography! They are like little mirrors reflecting your children and sky and everything around. They create THE best splash crowns. With a little clever work with light direction and angles, you can make them look amazing.
Light direction matters!
Seems like it shouldn't what with all of it coming from above, but unless you're shooting when the sun is just above you, it will make a difference. When you shoot roughly speaking AGAINST the sun ( backlight - remember? ) you will get a lovely reflection of the sky, but your children in it will look a lot more shadowy ( as they're effectively blocking the light). But if you walk around the puddle and shoot from the other side ( with light behind your back ) you will get a much clearer reflection of your subjects.
Please excuse the phone pic but I had to grab the opportunity while the kids obliged!

Photo by Andrea James

Work those angles
This is the fun play part - I like to shoot very low down to the ground, almost hovering above the surface of the water. It creates a unique reflective effect at the bottom, but raising it a little will let you fit more of the reflection in. In general low-ish down is better than from the CAP* position.
* CAP- Comfortable Adult Position
And if you have not had rain recently, you can replicate what my daughters recently came up with when they wanted to do some puddle play but there were no puddles around...

Week 4 challenge
Capture your child / children having fun with water - it doesn't matter what it is - a bath or a play with the water tray or a hose will work just as well as a paddle in a river, a jump through sprinklers or cooling down in a paddling pool.
As you capture your kids have a play, don't forget to pay attention to your light !
Don't forget to post to our Facebook group!
Photoparents Membership:
what's in it for you?
SELF PACED COURSES

All our courses, at your fingertips, available for you to dive in as you please and when you please. Because who says you can't start learning Photoshop on a rainy Tuesday with nothing else to do?
LIVE RUN COURSES

When you want the instructor live input to answer your questions, a weekly live class, a peer group to go through the course with you and weekly assignments to test your skills. All the courses in our range get at least 1 ( but sometimes 3!) yearly live runs/
ON DEMAND MENTORING

When you want in depth - and I mean - Oh My God, I didn't realise you will go into so much detail?! - in depth feedback and advice on your photos! The instructor goes through your images 1 by 1 with specific advice on what to improve and how. Available as an add-on (additional fee applies) to all our courses.
WEEKLY TUTORIALS

You know the lessons you've had with us in this Summer School? How would you like having one of those once a week, each week? With fantastic images on the theme shared by our community?? It's exactly what we give you inside our Project52 group and it's the perfect thing to give you focus and help you improve.
MONTHLY LIVE SESSION

Sometimes you need to branch out from what you know so we bring you a Monthly Live session with a featured photographer - last month Nicola talked to us about using video to capture your kids, before that we had sessions on sport photography, black and white photography, pet photography, creative techniques and architecture.
INTEREST GROUPS

In addition to our courses and resources we also have interest groups - such as Self portrait photography, Black and White photography, 365 Project all to help you channel your creativity the way it flows. More are planned!
KIDS COURSE!

The kids course is free for all members kids - this one runs once a year (we just kicked it off!) and it's a wonderful way to get your kids involved in a hobby you love!
DOWNLOADABLE RESOURCES

A recent addition - downloadable resources which we normally sell to the public are free for our members.